
Views: 0 Author: Site Editor Publish Time: 2026-06-29 Origin: Site


Thermal expansion inside a closed-loop water heating system creates immense pressure. Water physically expands as it heats up. This process requires extra volume inside your plumbing. Left unmitigated, this invisible force easily ruptures pipes. It can destroy expensive fixtures and flood your entire home.
Many homeowners and novice plumbers install relief mechanisms incorrectly. They misunderstand the fluid dynamics at play. Incorrect placement compromises system safety. It violates strict local plumbing codes. Bad placement also voids manufacturer warranties immediately. You simply cannot guess when securing these pressurized vessels.
You might wonder where to place these critical components. Does it go before or after the heater? The verdict remains absolute. You must mount your equipment on the cold water line. This specific placement is the inlet. This guide explores precise positioning rules. We will cover code compliance, proper sizing, and crucial structural support.
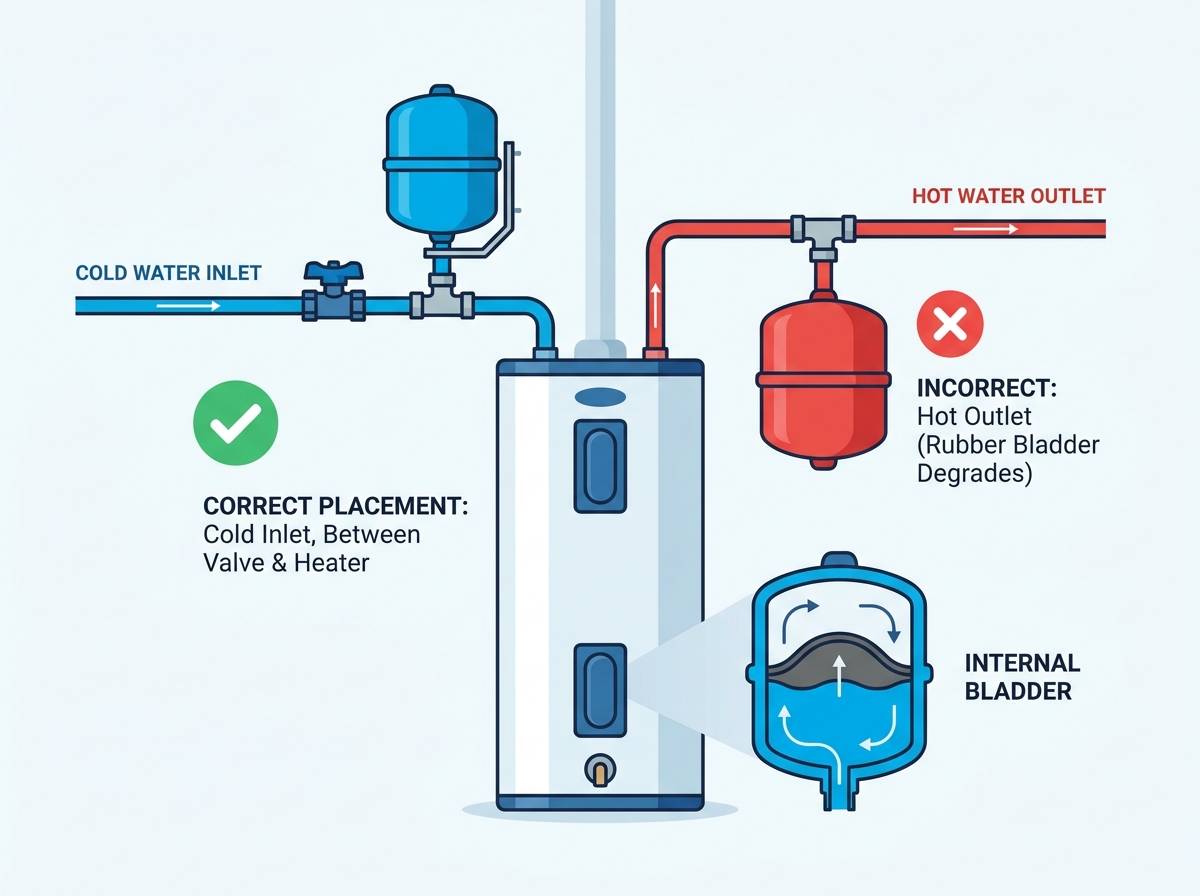
Placement: The expansion tank must be installed on the cold water inlet, never the hot water outlet.
Valve Location: It must be positioned between the water heater and the cold water shut-off valve.
Heat Degradation: Hot water degrades the internal rubber bladder; cold side installation maximizes component lifespan.
Structural Support: A water-logged expansion tank is heavy; proper mounting using hardware like a Round Expansion Tank Bracket is required to prevent pipe stress.
Engineers design every expansion tank exclusively for the cold water supply line. You should never deviate from this core rule. Placing it on the hot side invites disaster. The cold inlet provides a stable environment. It protects internal components from extreme thermal shock.
Continuous exposure to hot water accelerates physical breakdowns. The internal diaphragm consists of butyl rubber. Hot water strips the plasticizers from this rubber over time. The bladder becomes brittle. It loses its elasticity. Once the rubber hardens, it tears during pressure changes. A torn bladder fills the upper air chamber with water. The vessel becomes completely water-logged and useless.
Thermal expansion pushes back against incoming flow. Water expands in all directions inside a closed vessel. It naturally seeks the path of least resistance. This path leads straight back up the cold water inlet. Placing the unit on the inlet captures this pressure perfectly. It absorbs the expanded volume before pressure strains the primary heating vessel.
Original Equipment Manufacturers (OEMs) dictate strict installation parameters. Nearly all OEM manuals specify cold-side installation. They test their products under these exact conditions. Deviation automatically voids warranties. If a heater splits a seam, the inspector checks the plumbing layout. Finding an outlet-mounted unit guarantees a denied warranty claim.
Installation Location | Temperature Exposure | Bladder Lifespan | Warranty Status |
|---|---|---|---|
Cold Water Inlet | Low / Ambient | Maximum (5-10 years) | Intact |
Hot Water Outlet | High (120°F - 140°F) | Severely Reduced (1-3 years) | Voided |
You must follow the strict "between" rule for pipe placement. Plumbers must place the unit between the cold water shut-off valve and the water heater inlet. This specific segment of pipe remains continuously open to the heater. It ensures an uninterrupted hydraulic connection. The relief vessel cannot do its job if valves block the path.
Installing the unit before the shut-off valve creates severe system isolation risks. Homeowners sometimes close this shut-off valve for maintenance. If the valve shuts, it separates the heater from the relief vessel. The water heater continues to heat existing fluid. Pressure spikes rapidly inside the isolated tank. This scenario neutralizes the ability to absorb thermal expansion. It often triggers the Temperature and Pressure (T&P) relief valve to blow.
Modern municipal water supplies rely heavily on Check Valves and Pressure Reducing Valves (PRVs). Cities install these devices at the street meter. They prevent contaminated water from flowing back into the public supply. However, this creates a "closed system" in your home. Expanding water can no longer push back into the city main.
A closed system traps all thermal expansion indoors. The expanding fluid acts like a hydraulic press against your pipes. The presence of a PRV makes precise placement incredibly critical. Your expansion tank becomes the sole defense mechanism. You must position it where it has unhindered access to the expanding fluid.
You must calculate the operational weight of these vessels. They seem lightweight when empty. However, water weighs roughly 8.34 pounds per gallon. A standard 2-gallon unit holds significant weight during a pressure event. The steel housing adds another 5 pounds. The total operational weight often exceeds 20 pounds. You cannot ignore this sudden weight increase.
Suspending a heavy steel vessel solely by a 3/4-inch fitting creates dangerous piping strain. Copper pipes and PEX fittings cannot bear lateral torque. Constant temperature fluctuations cause tiny vibrations. The heavy vessel sways slightly over time. This continuous motion leads to joint fatigue. The solder cracks. PEX crimps loosen. Eventually, you experience catastrophic pipe snaps and flooded basements.
You need proper mechanical mounting solutions. Plumbers often debate wall mounting versus temporary strapping. Temporary metal plumber's tape looks cheap and performs poorly. It sags under dynamic loads. You must anchor the system rigidly to adjacent structures. Wall studs and floor joists provide excellent anchoring points.
We highly recommend using a Round Expansion Tank Bracket to secure the unit to a wall or joist. This hardware wraps entirely around the cylinder. It transfers the entire physical load away from the fragile pipe joints. The bracket bolts directly into structural wood or concrete.
You should evaluate brackets carefully before purchasing. Look for high corrosion resistance. Basements and utility closets experience high humidity. Rusty hardware fails unexpectedly. Seek out adjustable banding. Adjustable straps accommodate slight variations in cylinder diameters. Finally, verify the structural load ratings. The rating must exceed the operational water-logged weight of your specific model.
The Uniform Plumbing Code (UPC) and International Plumbing Code (IPC) govern thermal expansion control. These standardized frameworks dictate building safety across North America. Section 607.3 of the IPC specifically mandates thermal expansion control for closed systems. Inspectors enforce these rules rigidly. They fail non-compliant setups without hesitation.
Municipal inspectors rely on specific visual checkpoints. They look for proximity to the water heater. Codes require the vessel to sit adequately close to the heat source. Plumbers typically keep it within a few feet of the cold inlet. Long pipe runs reduce the responsiveness of the pressure relief.
Inspectors also verify the absence of isolation valves. They trace the pipe from the heater up to the vessel. Any ball valve or gate valve located in this path triggers an automatic failure. No user should have the ability to accidentally isolate the safety device.
Physical support represents a major inspection checkpoint. Inspectors reject units left dangling by their threads. They look for dedicated, permanent physical supports. They want to see professional hardware. Using a Round Expansion Tank Bracket passes inspection easily. It proves the installation meets structural safety standards. Temporary strapping often fails these rigorous checks.
Clearance requirements ensure long-term maintenance access. Every unit features an air valve called a Schrader valve. It looks identical to a car tire valve. Homeowners must test this valve annually. Inspectors check if this valve remains accessible. If you mount the unit tight against the ceiling, you cannot attach a pressure gauge. Always leave at least six inches of clearance around the Schrader valve.
You must match the system pressure before connecting any pipes. This mandatory step prevents premature failure. Every unit ships from the factory with a default pre-charge. This pre-charge usually sits around 40 PSI. However, your home's static water pressure might measure 60 PSI. You cannot install it blindly.
You must check your home's static water pressure first. Attach a simple water pressure gauge to an outdoor spigot. Open the spigot and read the dial. You then use a standard bicycle pump to adjust the vessel's pre-charge. The internal air pressure must exactly match the home's static water pressure. Do this while the unit sits on the floor. It becomes impossible to adjust accurately once water fills the lines.
Tank sizing logic follows strict volume ratios. A small vessel cannot absorb the expansion of a massive commercial heater. You must calculate the primary heating volume accurately.
Water Heater Capacity | Recommended Tank Size | Common Application |
|---|---|---|
Up to 50 Gallons | 2.0 Gallons | Standard Residential Homes |
51 to 80 Gallons | 4.5 Gallons | Large Homes / Light Commercial |
81 to 120 Gallons | 10.0+ Gallons | Heavy Commercial Systems |
Your shortlisting next steps require careful planning. First, verify your current home pressure using a reliable gauge. Second, select the appropriately sized unit based on your heater's capacity. Third, procure the necessary copper or PEX fittings. Finally, purchase proper mounting brackets for a fully compliant build. Rushing these steps leads to leaks and failed inspections.
Cold water inlet installation remains completely non-negotiable. This placement guarantees safety and prolongs component longevity. Hot water rapidly destroys internal rubber bladders. You must protect these sensitive materials by keeping them on the cold supply side. Furthermore, proper placement ensures your manufacturer warranty remains entirely valid.
Treat physical mounting steps with extreme priority. A dangling steel vessel creates an active hazard in your utility room. Secure it firmly using mechanical brackets. Pre-pressurize the chamber to match your home's static baseline. These preparation steps hold just as much importance as the pipe placement itself.
Review your heater's specification sheet today. Verify your system volume before heading to the hardware store. Acquire the proper sizing vessels and dedicated mounting hardware. Do this long before cutting into your home's plumbing lines. Proper preparation ensures a leak-free, code-compliant result.
A: Yes, most can be installed vertically or horizontally. However, horizontal or inverted installations dramatically increase the leverage and strain on the pipe. Gravity pulls the water-logged weight downward. This stress makes a structural bracket absolutely mandatory to prevent snapped pipes.
A: The unit will technically absorb pressure initially. However, the internal rubber bladder will prematurely fail due to high heat exposure. Hot water ruins butyl rubber elasticity. This leads to a completely water-logged vessel, eventual leakage, and a voided manufacturer warranty.
A: Yes. While local codes vary slightly, it should be installed as close to the water heater as practically possible. You must place it on the cold inlet line. Close proximity allows it to respond immediately and effectively to thermal expansion spikes.
A: If you live on an "open system" without backflow prevention, thermal expansion can safely push back into the city main. However, many modern municipalities continuously install new check valves at meters. This converts older homes to "closed systems." Always verify your local codes.


