Views: 0 Author: Site Editor Publish Time: 2026-02-11 Origin: Site


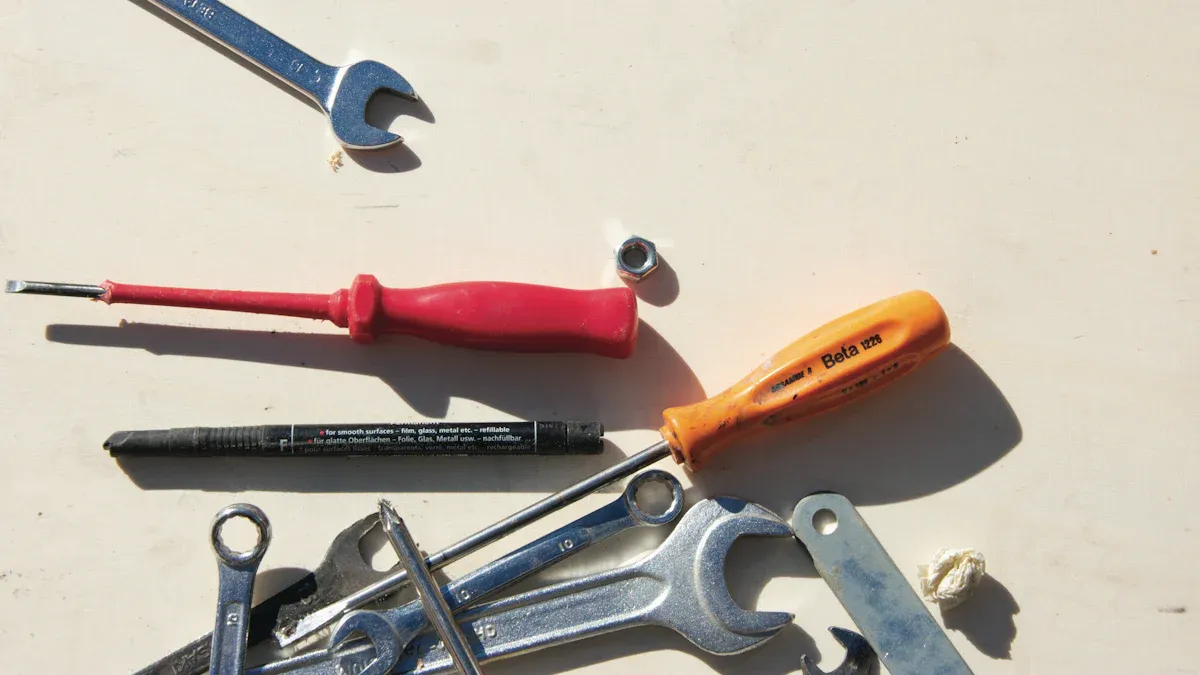
A successful expansion vessel installation starts with the right tools. The top 10 essentials include a pipe wrench, adjustable wrench, pipe cutter, Teflon tape, pressure gauge, bicycle pump, pipe bender, level tool, flashlight, and plumber putty. For robust support, the Easywell Expansion Tank Bracket Series stands out as a reliable choice. This guide answers key questions, including What is the correct way to install an expansion vessel? Use this guide to ensure safety, accuracy, and long-term system performance.
Gather essential tools like a pipe wrench, adjustable wrench, and pipe cutter for a successful installation.
Use Teflon tape to create leak-proof seals on threaded connections, ensuring system integrity.
Check water pressure with a pressure gauge before installation to set the correct pre-charge for the expansion tank.
Utilize a bicycle pump to adjust the air pressure in the expansion tank, maintaining system stability.
Ensure proper alignment with a level tool to prevent stress on pipes and fittings during installation.
Inspect all tools before use to reduce the risk of accidents and ensure precise work.
Select the right expansion tank bracket model based on your installation environment for optimal support.
Follow a systematic installation process to ensure safety and compliance with industry standards.
Selecting the right equipment is the first step toward a successful expansion vessel installation. Each tool serves a specific purpose and contributes to the overall efficiency and safety of the process. Below is a list of the ten essential tools every installer should have on hand:
Pipe Wrench
Adjustable Wrench
Pipe Cutter
Teflon Tape
Pressure Gauge
Bicycle Pump
Pipe Bender
Level Tool
Flashlight
Plumber Putty
Tip: Always inspect your tools before starting any installation. Well-maintained equipment reduces the risk of accidents and ensures precise work.
This selection covers all the critical tasks, from cutting and connecting pipes to sealing joints and verifying system pressure. The inclusion of a level tool and flashlight helps maintain accuracy and visibility, especially in tight or dimly lit spaces. Plumber putty provides a reliable seal for threaded connections, preventing leaks and system failures.
Using the correct tools for expansion vessel installation is not just a matter of convenience. It directly impacts the quality and longevity of the system. Proper tools allow for secure fittings, accurate measurements, and safe handling of pressurized components. Inadequate or makeshift equipment can lead to leaks, pressure loss, or even system damage.
Note: The right tools also help installers work more efficiently, reducing downtime and minimizing the risk of costly errors.
Professional installers understand that each step in the installation process requires precision. For example, a pipe cutter ensures clean, burr-free edges, which are essential for leak-proof joints. A pressure gauge allows for accurate monitoring, ensuring the vessel operates within safe parameters. The use of a dedicated expansion tank bracket, such as the Easywell Expansion Tank Bracket Series, provides robust support and vibration control, further protecting the system.
Investing in quality tools pays off in the long run. It ensures that every installation meets industry standards and delivers reliable performance. Whether working in a residential, commercial, or industrial setting, having the right equipment on hand is the foundation of a successful project.
A precise installation process ensures the longevity and safety of any water heater installation. Many professionals ask, what is the correct way to install an expansion vessel? The answer lies in following a systematic approach that aligns with manufacturer recommendations and industry standards. Below is a step-by-step installation guide designed to help you install an expansion tank efficiently:
Turn off the power to the water heater and shut off the cold water supply.
Open a hot water faucet to relieve pressure and depressurize the system.
Use a pressure gauge to check the house water pressure. Pressurize the expansion vessel to 5–10 psi above this value using a bicycle pump.
Apply thread sealant or plumber’s tape to the tank connection for a secure seal.
Thread the expansion vessel onto the pipe fitting by hand.
For robust support, use the Easywell Expansion Tank Bracket Series. Select the appropriate model—Bowed, Round, or Square—based on your environment and system type.
Restore the cold water supply and power to the water heater.
Check for leaks at all connections.
Monitor the installation for moisture or leaks over the next 24 to 48 hours.
Document the installation process for future reference and compliance.
This installation process addresses the question, what is the correct way to install an expansion vessel? Each step in the installation process is critical for ensuring a safe and reliable water heater installation. The Easywell Expansion Tank Bracket Series provides stability and vibration control, reducing the risk of movement and damage during operation.
Safety precautions are essential throughout the installation process. Plumbing codes require that every hot water system includes an expansion tank, especially in multi-boiler installations. The expansion vessel must match the system’s pressure rating and comply with ASME standards for systems over 30 psi. Closed-type tanks must follow all manufacturer instructions.
Requirement | Details |
|---|---|
Installation | Expansion tank required for every hot water system |
Type | Closed or open type permitted |
Pressure Rating | Must match system pressure |
Compliance | Closed-type tanks must follow manufacturer and ASME standards |
Common mistakes during the installation process include ignoring environmental conditions, installing an incorrectly sized vessel, and failing to follow manufacturer guidelines. These errors can lead to corrosion, pressure instability, and unsafe operation. To avoid these issues, always size the vessel correctly, consider the installation environment, and install a pressure gauge near the vessel for diagnostics.
Tip: Always perform leak testing and pressure verification as part of the installation process. This ensures the water heater installation meets safety and performance standards.
By following these steps and safety precautions, you can answer the question, what is the correct way to install an expansion vessel? Proper planning and adherence to the installation process will ensure a successful and compliant installation.
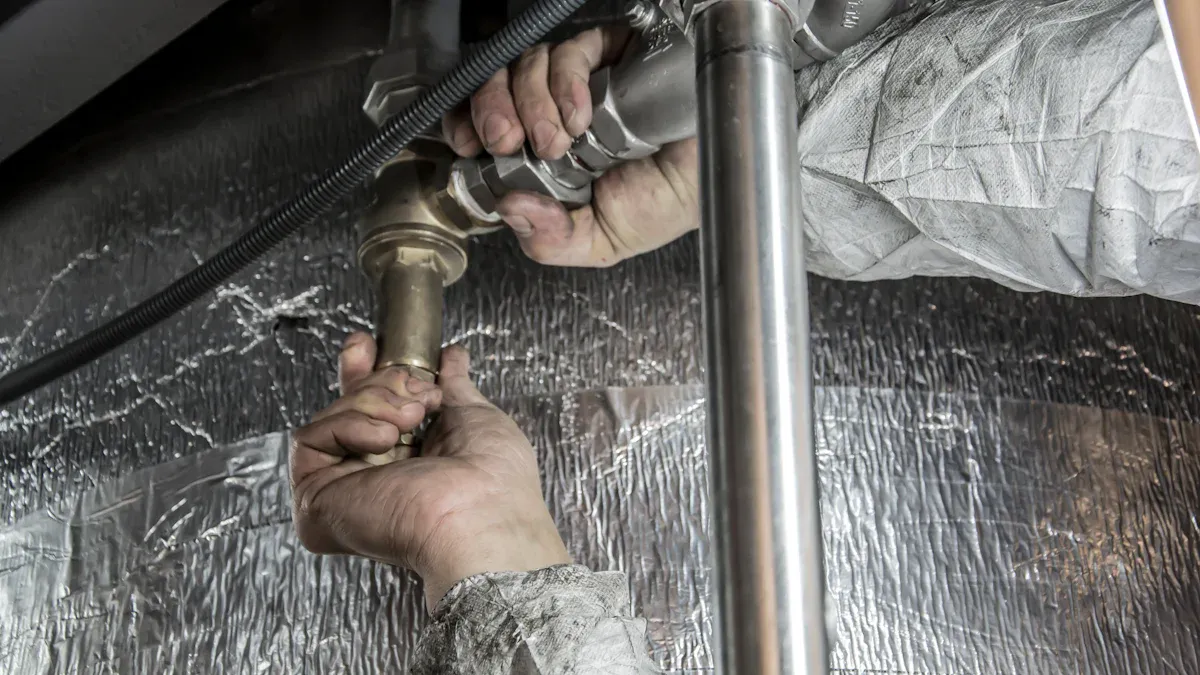
A pipe wrench is a heavy-duty hand tool designed for gripping and turning pipes and fittings. It features serrated jaws that provide a strong hold on round surfaces. The adjustable jaw allows the user to fit the wrench to different pipe diameters. Most pipe wrenches are made from forged steel, which ensures durability and long service life. The handle often includes a textured grip for better control during expansion tank installation.
Installers use the pipe wrench to tighten or loosen threaded connections on pipes. This tool is essential when working with metal piping during expansion tank installation. The wrench’s design allows it to apply significant torque, making it easier to break loose stubborn fittings or secure new connections. When installing an expansion tank, the pipe wrench helps ensure that all joints are tight and leak-free.
Always adjust the wrench to fit the pipe snugly before applying force.
Use two pipe wrenches together for added leverage when disconnecting old fittings.
Inspect the jaws regularly for wear to maintain a secure grip.
Avoid overtightening, which can damage threads or deform pipes.
Tip: A well-maintained pipe wrench reduces the risk of slippage and injury during expansion tank installation.
The adjustable wrench, sometimes called a crescent wrench, is a versatile tool with a movable jaw. This feature allows it to fit a wide range of nut and bolt sizes. The slim profile makes it ideal for working in confined spaces, such as those often encountered during expansion tank installation. Most adjustable wrenches are constructed from chrome-vanadium steel, which resists corrosion and provides strength.
Installers use the adjustable wrench to tighten or loosen nuts and bolts on pipe fittings, brackets, and mounting hardware. During expansion tank installation, this tool is especially useful for securing the expansion tank bracket and making fine adjustments to connections. Its adaptability means it can replace several fixed-size wrenches in your toolkit.
Set the jaw to the exact size of the fastener to prevent rounding edges.
Hold the wrench so that force is applied toward the fixed jaw for better stability.
Clean and lubricate the adjustment mechanism regularly to ensure smooth operation.
Use the adjustable wrench for final tightening after initial assembly with a pipe wrench.
Note: The adjustable wrench is indispensable for expansion tank installation due to its flexibility and ease of use.
A pipe cutter is a precision tool designed to make clean, straight cuts in copper, PVC, or steel pipes. It typically features a sharp cutting wheel and adjustable rollers that clamp around the pipe. The compact design allows for use in tight spaces, which is common during expansion tank installation. Some models include a deburring tool to smooth the cut edges.
Installers use the pipe cutter to trim pipes to the correct length before connecting them to the expansion tank. This tool ensures a smooth, burr-free edge, which is critical for creating leak-proof joints. Accurate pipe cutting is essential for proper alignment and fit during expansion tank installation.
Rotate the cutter around the pipe several times, tightening the knob slightly with each pass.
Use the built-in deburring tool to remove sharp edges after cutting.
Select a pipe cutter that matches the material and diameter of the pipe.
Keep the cutting wheel sharp for clean, effortless cuts.
Tip: A quality pipe cutter saves time and reduces the risk of leaks in your expansion tank installation.
Teflon tape, also known as PTFE tape, is a staple among tools for any expansion tank installation. This tape is manufactured from polytetrafluoroethylene, a material known for its low friction and high chemical resistance. Teflon tape is non-adhesive, thin, and flexible, allowing it to conform to the threads of pipe fittings. It is available in various widths and thicknesses, making it suitable for both residential and commercial expansion tank applications.
Teflon tape is effective for sealing threaded connections in pressurized water systems and central heating systems.
The tape’s low friction properties enable easier screwing of tapered pipe threads, which enhances the sealing capability.
It prevents leaks by filling the microscopic gaps between threads, ensuring a watertight seal.
Installers wrap Teflon tape around the male threads of pipe fittings before connecting them to the expansion tank. This process is essential for creating a leak-proof joint during installation. The tape should be applied in the direction of the thread spiral, typically two to three wraps, to ensure full coverage without excess bulk. Teflon tape is especially important when connecting the expansion tank to copper or steel piping, as it helps prevent corrosion and seizing.
Tip: Always start wrapping at the end of the pipe and work toward the fitting. This technique ensures the tape does not unravel during assembly.
Choose the correct width of Teflon tape for the pipe size to avoid overhanging edges.
Avoid overlapping the tape excessively, as this can make threading difficult.
Store Teflon tape in a dry place to maintain its effectiveness.
Use only PTFE tape rated for potable water when installing an expansion tank in a drinking water system.
A pressure gauge is a precision instrument used to measure the water pressure in plumbing systems. It typically features a dial display, a threaded connection, and a Bourdon tube mechanism for accurate readings. Pressure gauges come in various pressure ranges, with models designed specifically for expansion tank installation. The gauge must be compatible with the system’s pressure rating to ensure reliable monitoring.
The pressure gauge plays a critical role in both the installation and maintenance of an expansion tank. Installers use the gauge to check the home’s water pressure before beginning the installation. This step determines the correct pre-charge pressure for the expansion tank. The gauge is also used to compare the pre-charged pressure at the Schrader valve and to verify system pressure after installation.
Check the water pressure of the home using the gauge.
Compare the reading to the pre-charged pressure of the expansion tank.
Adjust the tank’s pressure using a bicycle pump to 5–10 psi above the home’s water pressure.
Note: Accurate pressure readings are essential for the safe operation of the expansion tank and for preventing system failures.
Select a pressure gauge with a clear, easy-to-read dial for quick diagnostics.
Install the gauge near the expansion tank for convenient monitoring.
Calibrate the gauge periodically to maintain accuracy.
Record pressure readings during installation for future reference.
A bicycle pump is a manual air pump equipped with a hose and a Schrader valve fitting. It is lightweight, portable, and easy to operate, making it a practical tool for expansion tank installation. The pump allows precise control over the amount of air added to the tank, which is crucial for system performance.
The bicycle pump is used to add air to the expansion tank.
It ensures the air pressure in the tank aligns with the home’s water pressure.
Proper air pressure is essential for the effective operation of the thermal expansion tank.
During installation, the bicycle pump is connected to the Schrader valve on the expansion tank. The installer adds air until the tank’s pressure reaches the desired level, typically 5–10 psi above the measured water pressure. This adjustment ensures the expansion tank can absorb thermal expansion and maintain system stability.
Tip: Use short bursts when pumping air to avoid over-pressurizing the expansion tank.
Always use a pressure gauge in conjunction with the bicycle pump to monitor pressure accurately.
Release air slowly if the pressure exceeds the recommended value.
Store the pump in a clean, dry location to prevent contamination of the valve.
Check the pump’s hose and fittings for leaks before each use.
A pipe bender is a specialized tool that shapes pipes without causing kinks or flattening. It comes in manual and hydraulic models. Most pipe benders feature calibrated markings for precise angle measurements. The construction uses heavy-duty steel for durability. The handles provide leverage, making it easier to bend copper or soft steel pipes. This tool is essential for achieving smooth curves in piping systems.
Installers use a pipe bender when routing pipes to or from the expansion tank. The tool allows for accurate bends, which helps maintain proper flow and reduces stress on joints. During installation, the pipe bender ensures that pipes align perfectly with the expansion tank inlet and outlet. This alignment prevents leaks and supports the overall stability of the system. Installers often use the pipe bender in tight spaces where pre-bent pipes would not fit.
Tip: Always measure and mark the pipe before bending. This practice ensures that the bend occurs at the correct location for the expansion tank connection.
Select the correct size die for the pipe diameter.
Apply steady pressure to avoid sudden bends.
Check the angle with a level tool after bending.
Practice on scrap pipe before working on the actual expansion tank installation.
A level tool is a measuring device that determines whether a surface is horizontal or vertical. Most models use a sealed vial filled with liquid and an air bubble. The body is often made from aluminum or reinforced plastic. Some level tools include magnetic strips for hands-free use on metal surfaces. Digital models provide electronic readouts for increased accuracy.
Installers rely on the level tool to ensure that the expansion tank sits perfectly horizontal or vertical during installation. Proper alignment is critical for the safe operation of the expansion tank. The level tool helps prevent stress on pipe joints and mounting brackets. Installers use it when attaching the expansion tank bracket to the wall or ceiling. Accurate leveling also improves the appearance of the finished installation.
Note: A level expansion tank reduces the risk of vibration and noise in the system.
Place the level tool on top of the expansion tank before tightening the bracket.
Recheck alignment after securing all fasteners.
Clean the tool’s surface to avoid inaccurate readings.
Use a digital level for complex installations.
A flashlight is a portable lighting device powered by batteries or rechargeable cells. Modern flashlights use LED bulbs for bright, energy-efficient illumination. Many models feature adjustable beams and rugged, water-resistant housings. Some flashlights include magnetic bases or hooks for hands-free operation. Compact designs fit easily in a tool belt or pocket.
Installers use a flashlight to illuminate dark or confined spaces during expansion tank installation. Good visibility is essential for inspecting pipe connections and reading pressure gauges. The flashlight helps identify leaks or loose fittings around the expansion tank. It also assists in aligning the expansion tank bracket in poorly lit mechanical rooms. Reliable lighting ensures that every step of the installation meets safety standards.
Tip: Choose a flashlight with a long battery life for extended installation projects.
Keep spare batteries on hand.
Use the flashlight to double-check all connections before completing the installation.
Select a model with a focused beam for inspecting tight spaces.
Store the flashlight in a dry place to prevent corrosion.
Plumber putty is a soft, moldable compound used in plumbing to create watertight seals between rigid surfaces. It remains flexible after application, which allows for easy adjustments during assembly. The putty does not harden or crack over time, making it suitable for long-term use in non-pressurized plumbing tasks. Most plumber putty is non-toxic and easy to clean up, which adds convenience for installers.
Installers often use plumber putty to seal joints in sinks, faucets, and drains. The compound fills small gaps and prevents water from seeping through threaded or flanged connections. However, plumber putty is not recommended for pressurized systems. In expansion tank installation, the connections experience significant pressure changes. Plumber putty cannot withstand these forces and may fail to prevent leaks. For this reason, Teflon tape or pipe dope is the preferred choice for sealing threaded connections on an expansion tank.
Note: Always check the manufacturer’s guidelines before using plumber putty in any expansion tank installation.
Use plumber putty only on non-pressurized joints, such as sink drains or faucet bases.
Avoid applying putty to plastic parts, as some compounds may cause damage.
Store the putty in an airtight container to maintain its pliability.
Clean excess putty from surfaces after installation to ensure a neat finish.
An expansion tank bracket provides essential support for the expansion tank during installation. The bracket secures the tank to a wall or ceiling, preventing movement and reducing stress on connected pipes. The Easywell Expansion Tank Bracket Series offers three models: Bowed, Round, and Square. Each model addresses specific installation needs. The Bowed model uses corrosion-resistant materials and sealed joints, making it ideal for wet or chemically aggressive environments. The Round model features an adjustable clamp for a secure fit in residential and light-commercial systems. The Square model has a modular design that fits compact hydronic systems and factory-assembled HVAC units.
The Easywell Expansion Tank Bracket Series stands out for its durability and reliability. Stainless steel construction provides superior resistance to rust and corrosion compared to standard steel brackets. This ensures a longer lifespan, even in high-moisture or industrial settings.
Characteristic | Steel Brackets | Stainless Steel Brackets (Easywell) |
|---|---|---|
Corrosion Resistance | Prone to rust, needs coatings | Superior, ideal for moisture/chemicals |
Durability and Lifespan | Shorter, in harsh environments | Longer, minimal maintenance |
Weight and Strength | Strong, for heavy loads | Balanced, reliable in most conditions |
Installers select the appropriate expansion tank bracket based on the system type and environment. The Bowed model suits marine, bathroom, or industrial kitchen installations. The Round model works well for standard water heater setups. The Square model fits tight mechanical rooms or modular HVAC systems. During installation, the bracket is mounted securely to a wall or ceiling. The expansion tank is then clamped or strapped into place, ensuring stability and vibration control. This prevents movement that could damage pipes or fittings.
Tip: Always match the bracket model to the specific requirements of the expansion tank installation environment.
Inspect the mounting surface for strength before attaching the bracket.
Use corrosion-resistant fasteners in wet or chemical-prone areas.
Check that the expansion tank sits level in the bracket to avoid stress on connections.
Tighten all clamps and fasteners securely, but avoid overtightening to prevent damage.
For ceiling installations, verify that the structure can support the combined weight of the expansion tank and bracket.
Selecting the right tool for expansion tank installation requires careful consideration of several criteria. Each tool must meet the demands of the system and ensure a safe, efficient process. The following table outlines the main criteria for comparing tools used in expansion tank installation, along with a summary of how each tool aligns with these requirements.
Tool | System Volume & Vessel Size | Max Operating Temperature | Static Head | Pressure Rating | Key Benefit |
|---|---|---|---|---|---|
Pipe Wrench | ✔ | ✔ | ✔ | ✔ | Secure pipe connections |
Adjustable Wrench | ✔ | ✔ | ✔ | ✔ | Versatile for various fittings |
Pipe Cutter | ✔ | ✔ | ✔ | ✔ | Clean, precise pipe cuts |
Teflon Tape | ✔ | ✔ | ✔ | ✔ | Leak-proof threaded joints |
Pressure Gauge | ✔ | ✔ | ✔ | ✔ | Accurate pressure monitoring |
Bicycle Pump | ✔ | ✔ | ✔ | ✔ | Adjusts tank pre-charge pressure |
Pipe Bender | ✔ | ✔ | ✔ | ✔ | Custom pipe routing |
Level Tool | ✔ | ✔ | ✔ | ✔ | Ensures proper tank alignment |
Flashlight | ✔ | ✔ | ✔ | ✔ | Improves visibility |
Plumber Putty | ✔ | ✔ | ✔ | ✔ | Seals non-pressurized joints |
✔ | ✔ | ✔ | ✔ | Provides stable tank support |
Note: Every tool listed above supports the expansion tank installation process by addressing system volume, temperature, static head, and pressure rating requirements. This ensures the expansion tank operates safely and efficiently.
Each tool in the expansion tank installation toolkit serves a unique function. Understanding these roles helps installers achieve a reliable and code-compliant result.
Pipe wrench and adjustable wrench: Tighten and loosen pipe fittings, ensuring secure expansion tank connections.
Pipe cutter: Delivers clean cuts for precise pipe lengths, which is essential for a leak-free expansion tank setup.
Teflon tape: Seals threaded joints, preventing leaks in the expansion tank system.
Pressure gauge: Monitors system and expansion tank pressure, confirming safe operation.
Bicycle pump: Adjusts the air charge in the expansion tank to match system requirements.
Pipe bender: Shapes pipes for optimal routing to and from the expansion tank.
Level tool: Verifies that the expansion tank sits level, reducing stress on connections.
Flashlight: Illuminates work areas, making expansion tank installation safer and more accurate.
Plumber putty: Seals non-pressurized joints, supporting the overall integrity of the expansion tank system.
Expansion tank bracket: Secures the expansion tank, preventing movement and vibration.
️ Tip: Always match your tool selection to the specific requirements of your expansion tank installation. This approach ensures the system meets all safety and performance standards.
A complete toolkit ensures every expansion tank project meets industry standards. The Easywell Expansion Tank Bracket Series provides unmatched support and stability for any installation.
Gather all recommended tools before starting.
Review each step in the guide for accuracy.
Prioritize safety and system reliability.
Preparing in advance leads to efficient work and long-lasting results.
An expansion vessel absorbs excess pressure in a closed water heating system. It prevents damage to pipes and fittings. This component ensures system safety and extends equipment life.
Select a bracket based on the environment and tank size. The Easywell Bowed model suits wet or corrosive areas. The Round model fits standard systems. The Square model works in compact spaces.
A skilled DIYer can install an expansion vessel with the correct tools and safety knowledge. Always follow manufacturer instructions. Consult a licensed plumber for complex or commercial systems.
Key tools include a pipe wrench, adjustable wrench, pipe cutter, Teflon tape, pressure gauge, bicycle pump, pipe bender, level tool, flashlight, and plumber putty. A reliable expansion tank bracket is also necessary.
Check the system pressure with a gauge. Inspect for leaks or unusual noises. The vessel should maintain stable pressure during heating cycles. Replace the vessel if you notice waterlogging or pressure fluctuations.
The Easywell series offers robust support, corrosion resistance, and vibration control. Each model addresses specific installation needs. These features ensure safe, long-lasting expansion vessel installations.
Always turn off power and water supply before starting. Wear protective gear. Use the correct tools. Test for leaks after installation. Follow all local plumbing codes and manufacturer guidelines.
Inspect the vessel and bracket every six months. Check for leaks, corrosion, and secure mounting. Test system pressure regularly. Routine maintenance ensures optimal performance and safety.


