
Views: 0 Author: Site Editor Publish Time: 2026-06-29 Origin: Site


In closed-loop heating and plumbing systems, thermal expansion is inevitable, but pressure damage is highly preventable. Water expands when heated. This physical reality constantly threatens your sealed pipework. While the expansion vessel itself absorbs this excess volume, integrating it securely into an existing setup requires highly specific hardware. Piecing this assembly together component-by-component introduces several severe risks. You face potential leaks, future maintenance bottlenecks, and strict compliance issues. If you choose the wrong fitting, the entire network becomes vulnerable to catastrophic bursts.
An Expansion Vessel Connection Kit standardizes this critical installation process. It provides the necessary isolation valves, sturdy mounting brackets, and crucial pressure-relief components inside a single, vetted package. Readers will discover exactly how these integrated kits safeguard modern plumbing. You will learn the core anatomy of these assemblies, crucial selection criteria, and professional installation secrets to guarantee long-term system stability.
Purpose: Connection kits simplify the safe installation and future servicing of expansion vessels in sealed systems by integrating mounting hardware, flexible hoses, and service valves.
System Protection: The kit facilitates the vessel's core function—absorbing volumetric water expansion as temperatures rise—protecting pipework and boilers from catastrophic pressure failures.
Selection Criteria: Choosing the right kit depends on system type (potable vs. heating), vessel capacity (liters), and mounting requirements (e.g., utilizing a Round Expansion Tank Bracket Kit for secure wall mounting).
Implementation: Proper installation requires verifying the vessel's pre-charge pressure against cold system pressure before commissioning, a step often missed in DIY setups.
Understanding hardware value requires looking closely at the sum of its parts. Evaluating complete kits versus buying individual components reveals stark engineering differences. Piecemeal solutions often lack synergy. A dedicated kit provides tested, unified components designed specifically for pressure management. It eliminates the guesswork from complex plumbing assemblies.
The integrated service valve serves as the system's gatekeeper. We frequently refer to this as an isolation valve. It allows you to isolate the expansion vessel completely. You can drain the tank for annual maintenance. You can replace a failed unit rapidly. Crucially, this valve prevents you from draining the entire heating network. Draining a full system wastes chemically treated water. It also introduces harmful, corrosive air into your radiators.
Next, we examine the flexible braided hose. High-quality kits use WRAS-approved or similarly certified hoses. This flexible connection accommodates incredibly tight installation spaces. It routes easily around existing, immovable pipework. Furthermore, it physically isolates the vessel from boiler vibrations. This isolation significantly reduces mechanical stress on rigid copper or plastic pipes. Less vibration translates directly to fewer joint leaks.
Mounting solutions represent another critical anatomy component. A tank filled with water becomes exceptionally heavy. Relying on basic metal strapping invites structural disaster. Water weighs roughly one kilogram per liter. A standard 18-liter vessel exerts significant downward and lateral force. Securing it demands specialized hardware. Many professionals rely on a Round Expansion Tank Bracket Kit for secure, unshakeable wall mounting. These robust brackets distribute weight evenly across the surface. They prevent dangerous wall shear and protect the integrity of your entire mechanical room.
Finally, comprehensive kits include vital safety components. These assemblies typically feature a Pressure Relief Valve (PRV) and a visible analog pressure gauge. The PRV acts as a mechanical fail-safe mechanism. It forcibly discharges water if internal system pressure exceeds safe operational limits. The accompanying gauge provides continuous, real-time monitoring. You can verify system health instantly without attaching external diagnostic tools.
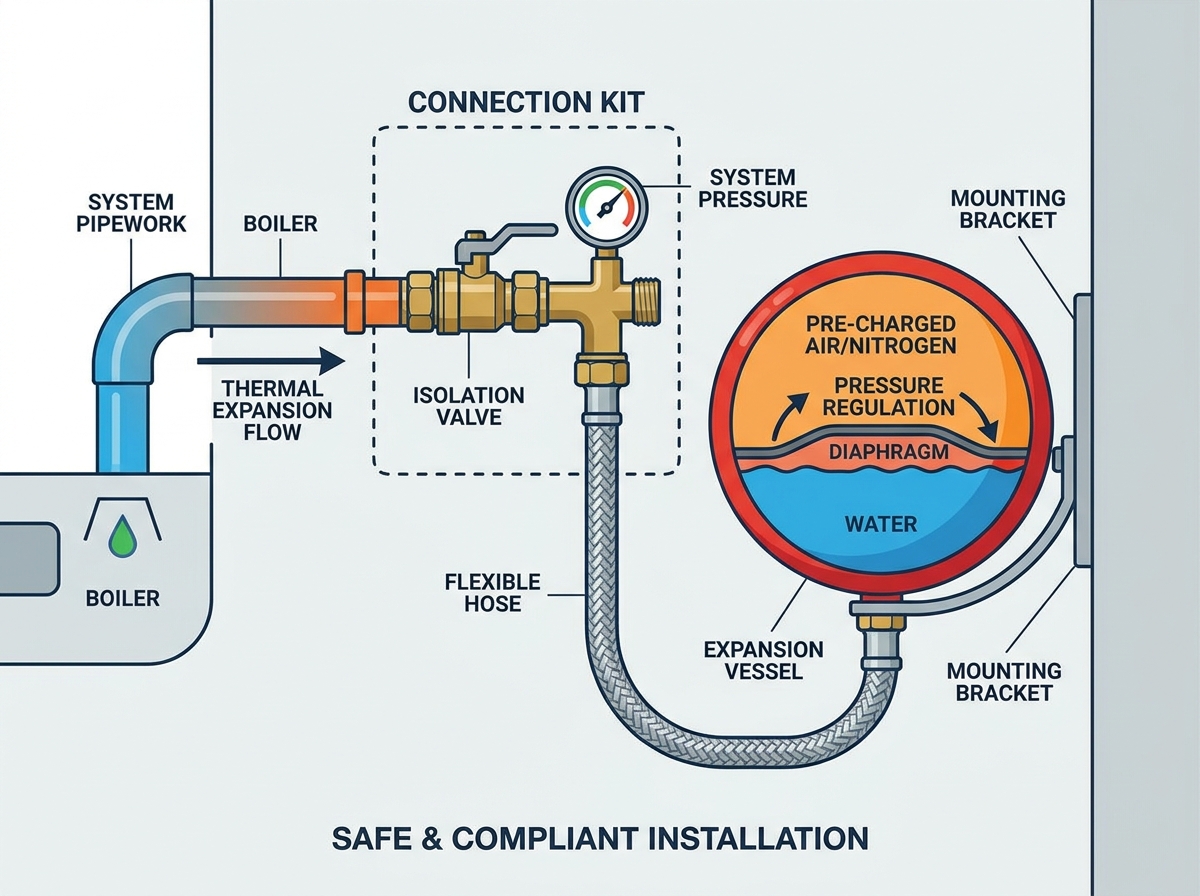
The fundamental physics remain relatively simple. Water expands predictably when heated. Rigid pipework cannot stretch to accommodate this newly created volume. The connection kit bridges your rigid pipes to the vessel's flexible internal diaphragm. It creates a safe, unrestricted open pathway for expanding hot water.
This setup enables dynamic, continuous pressure management. Inside the vessel, a durable rubber diaphragm separates system water from a pressurized gas chamber. This sealed chamber usually contains nitrogen or ambient air. As system water heats up, it expands outward. It travels safely through the connection kit and enters the vessel body. The incoming water pushes aggressively against the rubber diaphragm. The trapped gas behind it compresses to absorb the extra volume. When the water eventually cools, it contracts. The compressed gas pushes the water back into the pipework. The connection kit facilitates this vital bi-directional flow. It keeps system pressure perfectly stable during extreme temperature swings.
Operational differences exist between potable water systems and closed heating systems. You must understand these functional distinctions clearly. Unvented potable systems supply fresh drinking and bathing water. Sealed heating systems circulate toxic, chemically treated water exclusively for radiators. You cannot interchange their connection hardware under any circumstances.
Potable water kits require specific anti-legionella designs. Stagnant warm water breeds dangerous bacteria rapidly. Potable kits utilize internal flow-through mechanisms. They force fresh water to circulate continuously past the vessel connection port. They also mandate food-grade, highly certified materials. Standard boiler heating kits do not require these complex flow-through designs. Heating water remains isolated from human consumption.
System Comparison Chart
Component Feature | Potable (Unvented) Systems | Heating (Sealed) Systems |
|---|---|---|
Material Safety | Food-grade, NSF/WRAS certified | Standard brass or treated steel |
Bacterial Control | Flow-through design required | Dead-leg connections acceptable |
Typical PRV Rating | 3.0 bar to 6.0 bar | Usually 3.0 bar |
Operating Temperatures | High (DHW parameters) | Variable (Boiler parameters) |
Choosing the right hardware requires a strict focus on long-term outcomes. You must evaluate features carefully to avoid specifying the wrong product. An incorrect hardware specification leads directly to premature failure. It frequently voids expensive boiler warranties.
Load and scalability demand your immediate attention. You must closely match the bracket strength and hose bore to the actual vessel size. Residential systems often use small 2-liter up to 25-liter tanks. Heavy, high-capacity commercial vessels require heavy-duty bracket kits. A weak bracket will eventually succumb to wall shear. This causes the tank to crash, rupturing connected pipes instantly.
Material quality dictates component longevity. You should evaluate heavy brass fittings against cheaper alloy alternatives. Solid brass resists aggressive dezincification and cracking. Cheap alloys degrade quickly under constant thermal pressure. Compliance marks remain equally crucial. You must look for WRAS approval for installations in the UK. US installations absolutely require NSF/ANSI certification for all potable systems.
Maintenance accessibility separates standard kits from professional-grade ones. Does the kit include a robust lockshield valve? Tamper-proof isolation valves prevent accidental closure by uninformed homeowners. Closing an isolation valve while the boiler runs triggers dangerous pressure spikes. You should prioritize kits featuring a built-in drain-off point. This specific drain must sit directly on the vessel side of the isolation valve. It allows you to empty a heavy, waterlogged tank safely before attempting physical removal.
Follow these essential hardware selection best practices:
Verify the thread sizing accurately (typically 1/2-inch or 3/4-inch BSP/NPT).
Confirm the maximum pressure rating matches your PRV blow-off specifications.
Ensure the bracket diameter securely embraces your specific vessel model.
Check for physical anti-tamper mechanisms on all critical isolation valves.
Confirm the hose length prevents sharp bends or structural kinking.
The transition from purchase to successful rollout involves specific implementation risks. Proper professional execution prevents frustrating, long-term plumbing headaches. Minor installation errors compound rapidly over time.
Pre-installation preparation separates seasoned experts from DIY amateurs. You face one absolute necessity before mounting anything to the wall. You must check and adjust the vessel’s pre-charge air pressure. You perform this using a standard automotive or HVAC pressure gauge. You must complete this vital step before connecting the tank to the wet system.
Execute these sequential steps for flawless installation preparation:
Locate the protected Schrader valve on the rear of the expansion vessel.
Attach an accurate digital or analog pressure gauge directly to the valve.
Compare the factory pre-charge against your required cold system baseline pressure.
Release excess air or use a hand pump to add pressure until it perfectly matches your target.
Replace the protective dust cap securely to prevent micro-leaks.
Orientation and mounting drastically affect overall component lifespan. Best practices dictate very specific positioning. Ideally, you should mount the vessel hanging vertically downward. Alternatively, you can support it firmly upward from its base. These preferred positions prevent harmful internal air entrapment. They also significantly reduce uneven physical stress on the internal rubber diaphragm. Using a reliable mounting assembly guarantees the tank remains perfectly stable.
We must strongly address a widespread TikTok and YouTube pitfall. Many viral DIY videos demonstrate highly dangerous shortcuts. The most common field failure involves installing vessels entirely without an isolation valve. Content creators often skip this vital step to save a few dollars. This shortcut transforms a simple 10-minute future service job into a multi-hour nightmare. Without the isolation valve, you must drain the entire house down just to check the pre-charge pressure accurately.
Post-installation credibility relies entirely on proving your operational expertise. A well-installed system runs quietly and maintains stable pressure endlessly. However, ongoing proactive maintenance guarantees true long-term success.
Your annual servicing standard operating procedure (SOP) relies heavily on the connection kit. You must use the kit’s isolation valve to test the vessel properly. First, close the isolation valve tightly. This safely separates the tank from active system pressure. Next, open the integrated drain port. This empties the heavy water side of the vessel. Only then can you check the air side accurately. If you test the air valve while the tank remains fully pressurized by the wet system, you get a completely false reading. The connection kit makes this correct testing SOP fast, safe, and efficient.
Spotting system failures early prevents devastating plumbing disasters. You should monitor the installation visually on a periodic basis. A failed internal diaphragm provides distinct warning signs. If you press the Schrader valve pin and water squirts out, the internal bladder has completely ruptured. The tank is flooded, heavy, and useless. You must replace the vessel immediately.
You must also watch carefully for external system leaks. Inspect the braided connection hose for weeping joints or frayed steel threads. Check the isolation valve packing nut for tiny moisture beads. A constantly leaking hose often indicates excessive system vibration. It might also signal chemical degradation of the inner rubber lining. Address these micro-leaks promptly before they escalate into major property damage.
The logic for shortlisting the perfect hardware remains highly straightforward. The best connection kit matches your specific fluid system type perfectly. It safely and reliably supports the maximum water weight of your chosen tank size. Most importantly, it features an integrated isolation and drain valve for completely seamless future servicing.
You must clearly confirm your exact vessel volume requirements today. Check your heating system's baseline cold pressure parameters meticulously. Verify your chosen wall structure can handle the intended maximum fluid load safely. Gather this crucial data before specifying any connection hardware or heavy-duty bracket assemblies. Doing so ensures a highly secure, fully compliant, and deeply reliable plumbing installation.
A: No, connection kits are not universal. Thread sizing varies significantly, typically utilizing 1/2-inch or 3/4-inch BSP/NPT fittings based on system volume. Furthermore, a strict regulatory difference exists between heating kits and potable water kits. Potable kits require food-grade materials and flow-through designs to prevent dangerous legionella bacteria growth.
A: Yes, structural brackets remain highly recommended over basic metal strapping. You must account for the weight of the water. Even a small 8-liter tank can weigh over 10 kilograms when completely full. Proper bracket kits prevent dangerous wall shear and protect surrounding pipework from structural stress.
A: This heavily depends on the system type. Standard closed-loop heating installations often allow capable DIY repairs. However, unvented hot water systems carry strict legal compliance rules. In many regions, working on high-pressure potable domestic systems requires specialized professional certification to ensure household safety and legal compliance.
A: The connection kit only manages thermal expansion. It cannot fix existing system volume loss. A continuous pressure drop usually points to an unadjusted pre-charge pressure inside the new vessel. Alternatively, you likely have hidden system-side micro-leaks in your radiator valves or underfloor pipework that require immediate investigation.


